StudyNotion Online Education Platform (MERN App) Website Link
Building StudyNotion: An EdTech Platform Powered by the MERN Stack Medium Link
StudyNotion is a comprehensive educational platform aimed at providing a seamless experience for students and educators alike. It offers a range of features that facilitate learning, collaboration, and resource sharing.
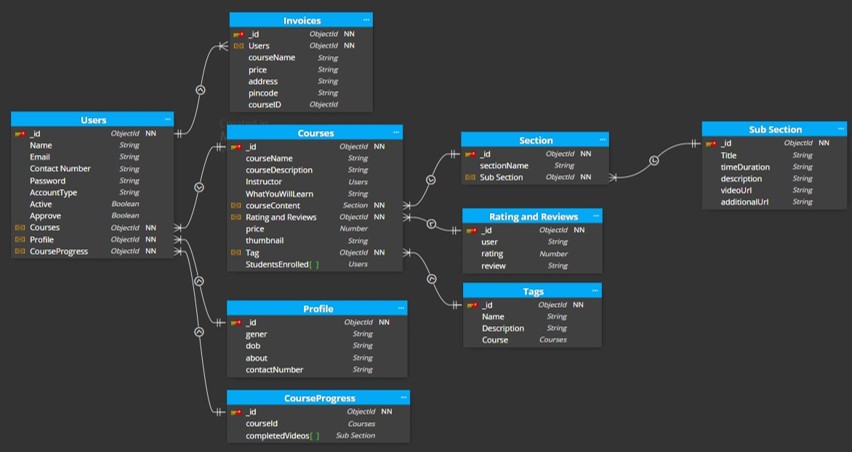
The StudyNotion project is designed to streamline the educational process. It allows users to access a variety of educational materials, collaborate on projects, and interact with educators, enhancing the learning experience. StudyNotion employs a monolithic architecture and leverages a tech stack involving React.js, Node.js, Express.js, MongoDB, Cloudinary, and Tailwind CSS.
StudyNotion is built using the following technologies:


- HTML:HTML (HyperText Markup Language) is a skeleton of a website, structuring content with tags and elements.
- CSS:CSS is a style sheet language used to style web pages.It enables the application of different styles based on media types and user preferences, enhancing user accessibility and readability
- JavaScript:JavaScript is a programming language used to add interactivity to websites.
- React.js:A JavaScript library for building user interfaces. It allows developers to create large web applications that can update and render efficiently in response to data changes.

- MongoDB: A NoSQL database that provides high performance, high availability, and easy scalability. It stores data in flexible, JSON-like documents.
- Express.js: A minimal and flexible Node.js web application framework that provides a robust set of features for web and mobile applications.
- Node.js: A JavaScript runtime built on Chrome's V8 JavaScript engine, enabling server-side scripting and running scripts server-side to produce dynamic web page content.

| ENDPOINT | API PATH |
|---|---|
| SENDOTP | api/v1/auth/sendotp |
| SIGNUP | api/v1/auth/signup |
| LOGIN | api/v1/auth/login |
| RESETPASSTOKEN | api/v1/auth/reset-password-token |
| RESETPASSWORD | api/v1/auth/reset-password |
| ENDPOINT | API PATH |
|---|---|
| GET_USER_DETAILS | api/v1/profile/getUserDetails |
| GET_USER_ENROLLED_COURSES | api/v1/profile/getEnrolledCourses |
| GET_INSTRUCTOR_DATA | api/v1/profile/instructorDashboard |
| ENDPOINT | API PATH |
|---|---|
| COURSE_PAYMENT | api/v1/payment/capturePayment |
| COURSE_VERIFY | api/v1/payment/verifyPayment |
| SEND_PAYMENT_SUCCESS_EMAIL | api/v1/payment/sendPaymentSuccessEmail |
| ENDPOINT | API PATH |
|---|---|
| GET_ALL_COURSE | api/v1/course/getAllCourses |
| COURSE_DETAILS | api/v1/course/getCourseDetails |
| EDIT_COURSE | api/v1/course/editCourse |
| COURSE_CATEGORIES | api/v1/course/showAllCategories |
| CREATE_COURSE | api/v1/course/createCourse |
| CREATE_SECTION | api/v1/course/addSection |
| CREATE_SUBSECTION | api/v1/course/addSubSection |
| UPDATE_SECTION | api/v1/course/updateSection |
| UPDATE_SUBSECTION | api/v1/course/updateSubSection |
| GET_ALL_INSTRUCTOR_COURSES | api/v1/course/getInstructorCourses |
| DELETE_SECTION | api/v1/course/deleteSection |
| DELETE_SUBSECTION | api/v1/course/deleteSubSection |
| DELETE_COURSE | api/v1/course/deleteCourse |
| GET_FULL_COURSE_DETAILS_AUTHENTICATED | api/v1/course/getFullCourseDetails |
| LECTURE_COMPLETION | api/v1/course/updateCourseProgress |
| CREATE_RATING | api/v1/course/createRating |
| ENDPOINT | API PATH |
|---|---|
| REVIEWS_DETAILS | api/v1/course/getReviews |
| ENDPOINT | API PATH |
|---|---|
| CATEGORIES | api/v1/course/showAllCategories |
| ENDPOINT | API PATH |
|---|---|
| CATALOG_PAGE_DATA | api/v1/course/getCategoryPageDetails |
| ENDPOINT | API PATH |
|---|---|
| CONTACT_US | api/v1/reach/contact |
| ENDPOINT | API PATH |
|---|---|
| UPDATE_DISPLAY_PICTURE | api/v1/profile/updateDisplayPicture |
| UPDATE_PROFILE | api/v1/profile/updateProfile |
| CHANGE_PASSWORD | api/v1/auth/changepassword |
| DELETE_PROFILE | api/v1/profile/deleteProfile |
The back end of StudyNotion provides a range of features and functionalities, including:
- USER AUTHENTICATION & AUTHORIZATION: Students and instructors can sign up and log in using email addresses and passwords. The platform supports OTP (One-Time Password) verification and forgot password functionality for enhanced security.
- COURSE MANAGEMENT: Instructors can create, read, update, and delete courses, manage course content, and media. Students can view and rate courses.
- PAYMENT INTEGRATION: Students can purchase and enroll in courses by completing the checkout flow that includes Razorpay integration for payment handling.
- CLOUD-BASED MEDIA MANAGEMENT: StudyNotion utilizes Cloudinary, a cloud-based media management service, to store and manage all media content, including images, videos, and documents.
- MARKDOWN FORMATTING: Course content is stored in Markdown format, allowing easier display and rendering on the front end.
The front end of StudyNotion is designed using Figma, a popular design tool that allows for the creation of clean and minimal user interfaces. It comprises various pages for Students, Instructors, and potential Admin functionalities:
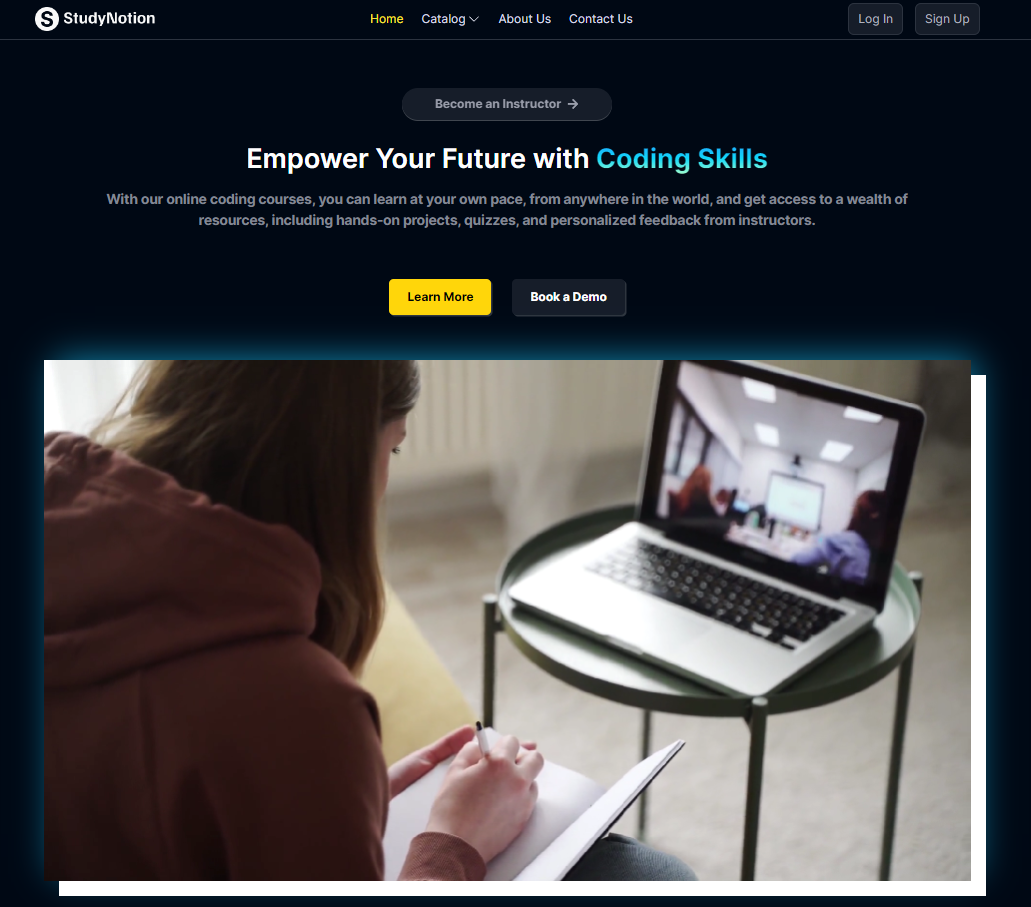
- HOMEPAGE: Brief introduction to the platform with links to the course list and user details.
- COURSE LIST: Displays all available courses with descriptions and ratings.
- WISHLIST: Shows courses added to the student's wishlist.
- CART CHECKOUT: Allows users to complete the course purchase.
- COOURSE CONTENT: Displays course material, including videos and related content.
- USER DETAILS: Contains information about the student's account.
- USER EDIT DETAILS: Enables students to edit their account details.
- DASHBOARD: Overview of the instructor's courses, including ratings and feedback.
- INSIGHTS: Detailed metrics of the instructor's courses.
- COURSE MANAGEMENT PAGES: Creation, update, and deletion of courses, as well as managing content and pricing.
- VIEW & EDIT PROFILE DETAILS: View and edit account details.
- DASHBOARD: Overview of the platform's courses, instructors, and students.
- INSIGHTS: Detailed metrics of the platform, including user count, courses, and revenue.
- INSTRUCTOR MANAGEMENT: Admin access to manage instructors, their account details, courses, and ratings.
- MISCELLANEOUS Access to user and course management pages.
In conclusion, this document outlines the architecture, features, and functionalities of the StudyNotion ed-tech platform. It highlights the use of MERN stack technologies and REST API design and outlines the deployment process using free hosting services, Vercel for the front-end, Render.com or Railway.app for the backend, and MongoDB Atlas for the database. Additionally, it lists potential future enhancements that could be implemented to improve the platform, along with their estimated timelines and priorities.
Throughout the development of the project, various achievements will be made in terms of implementing the desired functionalities and creating a user-friendly interface. However, there will be challenges to be faced during the development process, such as integrating different technologies and debugging errors.
To get started with StudyNotion on your local machine, follow these steps:
Before you begin, ensure you have the following prerequisites installed:
-
Node.js (version X.X.X) ⚙️
-
MongoDB (version X.X.X) 📦
-
Git 📂
-
Clone the Repository:
git clone https://github.com/skyeyeye/StudyNotion.git
-
Navigate to the Project Directory:
cd StudyNotion.git -
Install Dependencies:
npm install
-
Set Environment Variables:
cd serverCreate a
.envfile or rename it to.envif exists already in server for the following environment variables:PORT = 4000 MONGODB_URL = # Nodemailer MAIL_HOST = smtp.gmail.com MAIL_USER = MAIL_PASS = #*Controllers #login JWT_SECRET = #cloudinary CLOUD_NAME = API_KEY = API_SECRET = FOLDER_NAME = "StudyNotion" #*Config #Razorpay RAZORPAY_KEY = RAZORPAY_SECRET =
1] Keep the port number as it is.
2] For MONGODB_URL follow below steps –
- If you want to connect db locally replace MONGO_URI with
mongodb://localhost:27017/db_name, Where db_name is the database name, you can give yours. - If you want to connect using MONGO_ATLAS, then do the following steps
-
Signup or login for Mongo DB atlas via https://account.mongodb.com/account/register?_ga=2.174802465.288724901.1646250007-570639881.1643975138
-
Once you login, click on create button

-
Again, click on Create Cluster Button

-
Wait for few minutes, and then following dashboard will appear

-
Click on connect and choose your application.

-
Copy the URL and add your name and password in url, which you have set when creating cluster, and put it .env file.

-
3] For NodeMailer follow below steps –
- By default, Gmail prevents bots from accessing emails hosted on Google servers. Gmail runs several checks to ensure that every email account is accessed by a recognized user at a recognized location.
- Google requires your account to have two-factor authentication (2FA) enabled to connect it to Nodemailer.
- We’ll also need to set up an app password. To do so, follow these steps:
- Make sure you’re logged in to your Gmail account
- Under How you sign in to Google, select 2-Step Verification
- You’ll be prompted to sign in to your email again
- Scroll down to App passwords and click the arrow, >
- In the Select app dropdown, select your app or enter a custom name, then do the same for the Select device dropdown
- Click Generate, and a modal will pop up with your 16-digit app password.Copy it to somewhere secure
Now, Finally put your email in MAIL_USER & app password in MAIL_PASS in .env file. It is necessary, unless you will not receive OTP on your mail.
4] For JWT_SECRET follow the below steps –
- This is typically a secret key used for JWT (JSON Web Token) authentication in your application.
- You can generate a random string using a tool like crypto in Node.js. For example:
const crypto = require('crypto');
const jwtSecret = crypto.randomBytes(32).toString('hex');
console.log(jwtSecret);
- Copy the generated string and paste it as the value for JWT_SECRET in your .env file.
5] For Cloudinary follow the below steps –
- Sign Up for Cloudinary: Go to the Cloudinary website (https://cloudinary.com) and sign up for an account. You can choose the free plan to get started.
- Access Dashboard: After signing up and logging in, you'll be redirected to your Cloudinary dashboard.
- Find Your Cloud Name: Your Cloudinary cloud name is displayed on the dashboard. It's usually in the format [your_cloud_name]. Copy this value.
- Generate API Key and API Secret: In the Cloudinary dashboard, navigate to the "Account Details" or "Dashboard" section. Here, you'll find your API key and API secret. If you don't see them, you may need to generate them. Look for an option like "API Credentials" or "API Key & Secret".
- If you need to generate API key and secret, click on the appropriate button/link and Cloudinary will provide you with the key and secret.
- If they are already provided, simply copy them.
- Now that you have your Cloudinary “CLOUD_NAME”, “API_KEY”, and “API_SECRET”, you can set them up in your .env file as described earlier. CLOUD_NAME=your_cloud_name API_KEY=your_api_key API_SECRET=your_api_secret
6] For Razorpay follow the below steps-
- Log in to your Dashboard with appropriate credentials.
- Select the mode (Test or Live) for which you want to generate the API key.
- Select the
test modefor project. - Test Mode: The test mode is a simulation mode that you can use to test your integration flow. Your customers will not be able to make payments in this mode.
- Navigate to Account & Settings → API Keys (under Website and app settings) → Generate Key to generate key for the selected mode.
- The “Key Id” and “Key Secret” appear on a pop-up page. you can set them up in your .env file as described earlier. RAZORPAY_KEY = “your_razorpay_key” RAZORPAY_SECRET = “your_razorpay_secret”
- If you want to connect db locally replace MONGO_URI with
This project is licensed under the MIT License.
We would like to acknowledge the invaluable support and inspiration from the open-source community and various educational platforms that motivated us to develop StudyNotion.